Disclosure: Some of the links used here are affiliate links, meaning, at no additional cost to you, I will earn a commission if you click through and make a purchase. Learn more by reading the full Policies Disclosure.
Now, I know the Chart Neo app is primarily designed to be used with the Neo Fertility protocol, but can it be used with other protocols?
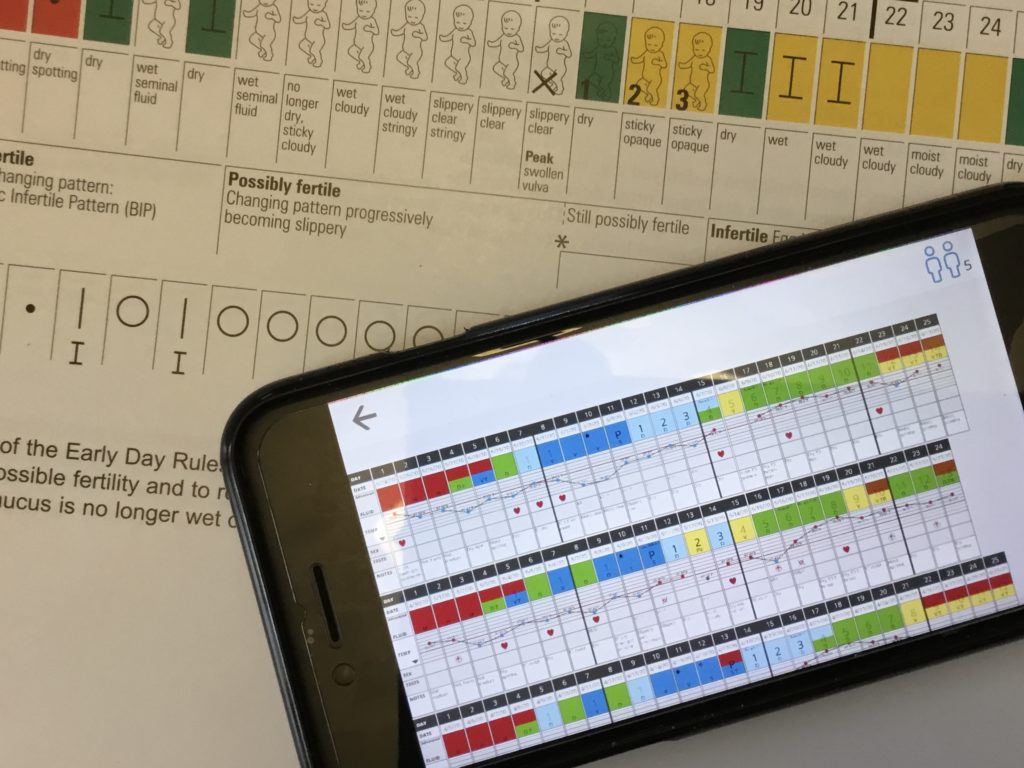
Yes! The Chart Neo app is one of my favorite options for being able to chart my Billings cervical mucus observations with cross checks.
Disclaimer
First thing to realize is that you can’t use the Chart Neo app to chart the “authentic,” approved Billings protocol and use that chart to turn into your Billings instructor. The Chart Neo app is not an approved Billings app. However, say you chart Billings and you want to add a BBT cross check to your charting. You want to be able to see both your Billings data and your BBT graph on the same chart. If this is you, then I think Chart Neo is a fabulous app for that. Basically, you maintain your regular Billings chart that your instructor will accept and you use Chart Neo to be able to see everything you chart, cross checks and all, on one chart together.
Getting Started
Get the Chart Neo app on your smartphone. Find links to download the app for iOS or Android at chartneo.com
Once you have downloaded the app on your smartphone, then you want to setup an account with Chart Neo. You get a free 45 day trial to test things out.
If you are using Tempdrop, then see this guide to get you started with using Tempdrop in the Chart Neo app.
If you’re not familiar with Tempdrop, it is a wearable charting thermometer, and by far the simplest way I’ve found to chart BBT. Get 10% OFF Tempdrop using this link.
Once you open the Chart Neo app on your phone, the first thing you’ll want to enter is the first day of your last menstrual period. This will get your first cycle in the app ready to go for you to start entering data.
Next you want to navigate to the “Account” section and check the box for “Advanced Mode: Disable fertile window interpretations.” This will help you be able to mark your chart correctly for Billings.
Notes Section

Once you’re all setup and ready to start charting, the first thing I want to you find is the “Notes…” section at the bottom of the data entry screen. This is where you will enter your same Billings notes about your sensation and visual observations, just like you do on your regular Billings chart.
The WWIT (Walking, Wiping, Inspect, and Test) sections at the top are just all about getting the app to give you the correct color stamp.
Translating Stamps
Chart Neo uses slightly different color stamps than Billings, but it’s relatively simple to translate the differences. Just like you can read a Billings chart with symbols and you can read a Billings chart with color stamps. Understanding Chart Neo color stamps is a very similar process.

WWIT Sections

WWIT stands for Walking, Wiping, Inspect, and Test. These are the four sections across the top of the data entry area. It’s how the Chart Neo app divides cervical mucus (CM) observations. Billings typically divides CM observations into vulvar sensation and visual observations. This is the information you put in your Billings notes. I’ll go over how to translate your Billings notes into the Chart Neo categories to get the app to correctly stamp your chart for Billings interpretation.
Walking Section

A lot of people who chart Billings seem to get tripped up by this section in the Chart Neo app, because the categories are too broad for Billings, which is absolutely true. However, remember, this is not actually where you are identifying your exact sensation. Your sensation is still correctly identified in your notes. What you are using this section for is just to get the color stamp you want.
If your end of the day sensation is “dry” (regardless of visual observation), then mark Dry here. This will mark the day as Green (unless another observation indicates Blue).
If your end of the day sensation is “slippery,” then mark Slippery here. This will mark the day as Bright Blue.
If your end of the day sensation is not dry and not slippery, even if it is your BIP, then mark “Vulvar Wetness” here, even if your sensation you write down is not “wet.” This will mark the day as Bright Blue.
*Don’t worry, I’ll come back to how to give yourself a yellow stamp shortly.
Wiping Section

In Billings you typically do not chart Wiping sensation. Please consult with your Billings instructor regarding specific advice on charting wiping sensation. For most Billings charters who do not note wiping sensation on their chart, they will simply enter “No Observation” for this section and move on to the next section.
Inspect Section

This category is honestly the one I have the most difficulty with when charting Billings. Here’s how I typically choose mark things:
If you have nothing seen, then select the “Dry, moist, or shiny” category.
If you have something seen, but it doesn’t really have a mucus look, then select the “Pasty” category.
If you have something seen and it does look like mucus, especially if any part is clear, then select the “Mucus” category. Clear observations always go in the “Mucus” category.
I generally skip using the other categories.
Don’t stress over getting this category exactly right. It’s mainly just the observations that are between nothing seen and clear mucus that can be difficult to categorize. Just be sure to pick one of the Blue categories for those types of observations, so that the app will give you a Blue stamp.
Test Section

Immediately you can select “No Observation” at the top, because that means you did not stretch test.
However, if you happen to notice naturally forming strings, then feel free to select the “Long, >=2cm” category. If you are unsure about how Billings identifies strings, then ask your Billings instructor for clarification on that.
If you have the option to select “Not Clear” or “Clear,” then you will need to select one of those. For the app’s purposes, if any part of your observation was clear, then select the “Clear” category. If all of your observations for the day were not clear, then select the “Not Clear” category.
In the previous Inspect section, if you selected any of the Green categories, “Dry, moist, or shiny” or “Wet Tissue,” then you will not be given the option to enter anything into the Test section. If you entered “Pasty” or “Gummy” previously, then you will not be given the option to select “Not Clear” or “Clear” in the Test section. You are only given the “Not Clear” or “Clear” option when you select “Mucus” in the previous Inspect section.
Bleeding Section

It defaults to “None” if you haven’t entered anything.
If you entered any bleeding option other than “None,” then you are given the option to mark if the bleeding was “Red” (includes pink observations) or “Brown/Dark.”
If you enter “Medium” or “Heavy,” then you will not be able to enter observations into the WWIT CM sections. This is fine, just keep your Billings notes in the Notes section going like normal. Remember, this is just to give you the full red stamp.
If you enter “Spotting” or “Light,” then you will be expected to enter your observations into the WWIT CM sections to get it to stamp correctly. I actually like this, because it clarifies at a glance looking at the stamp if it is a usable day or not.
“Start New Cycle” gets automatically selected if you have a full bleed that starts separate from your last full bleed. If you recognize that this bleed is not actually the start of a new cycle, simply uncheck that box to keep going in the same cycle chart.
Stamp/Peak Section
Yellow Stamps, Marking Your Billings Peak, & Manually Starting a Count

If you enter nothing, then it defaults to “Use Defaults” for both parts.
If you have a day that you know you would normally use a Billings Yellow Stamp or = symbol on, then select Yellow for that day. You still need to go through the WWIT sections to get the default Chart Neo stamp, which will likely be a Blue stamp, before you can change it to a Yellow stamp.
If you have identified your Billings Peak, then select P for that day. The app will automatically start counting the day after you have selected P. You do not have to tell the app to start counting the day after you select P.
If you need to start an EDR3 count, then select 1 for the first day of the count. The app will automatically keep counting until you tell it to “Stop Counting.” When there is a count on a day that would otherwise be marked Green, then the count day will be marked Light Blue to remind you it is potentially fertile. You can also manually mark a count day Yellow.
When applying EDR2 you can select a count of 1 for the SF day to get it to flag the day on your chart as Light Blue and potentially fertile. The day after the SF day you can select “Stop Counting” and it will return to default.
Sample Entry
Here’s an example of me entering the observation “moist, white” for a luteal phase day in Chart Neo.
Sharing your Chart Neo app chart with Your Instructor
The Chart Neo app also has the functionality to allow your instructor to securely and privately review your chart. If you are interested in me reviewing your Chart Neo app chart, then feel free to contact me to get more info about how that works.


